Handmade Crocheted Curtains
My mom loves to crochet and wanted to create a unique look for her living room, so she naturally decided to embark on a journey of dressing her windows with her own one of a kind crocheted curtains.
She poured over dozens of designs, looking for inspiration and finally combined several ideas to come up with the beautiful, delicate drapes you see below.
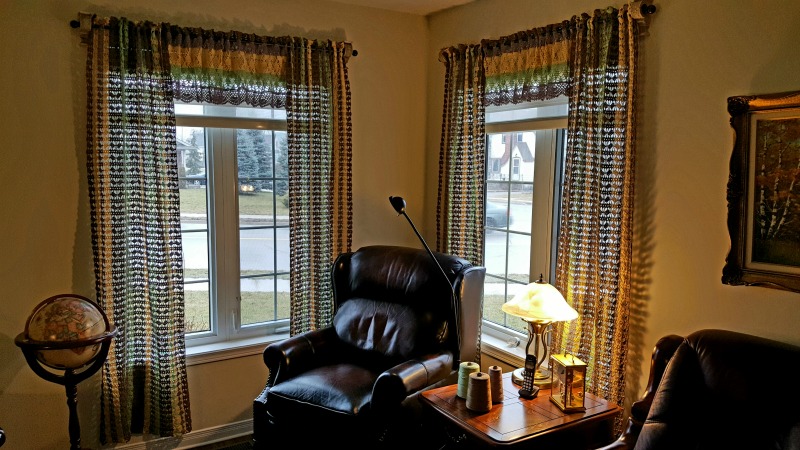 Mom's Handmade Crocheted Curtains
To make her vision come to life, the first place she headed was Mary Maxim. It's her favorite crochet supply shop. They have so many great choices. It's a virtual candy store of stitchery. They also have the added perk of allowing you to buy extra just in case you need it and return any unused product once your project is complete. When your designing curtains from inspiration and your imagination, that's a valuable perk. You're never quite sure how much product you're going to need till you cast the last stitch.
 Mom
MomMom settled on 4 colors for her crocheted curtains and chose Mary Maxim's cone cotton to achieve her look (buttery tones of brown, yellow, green and purple). I'll have to see if I can get the official names of colors to add here, but you'll likely want to mix and match your own colors anyway.
Since completing her curtains mom has been asked several times for the pattern, so she sat down and wrote it out for anyone who wants to use it. Here it is.
If you have any questions, feel free to contact us.
Handmade Crocheted Curtains Pattern
Materials Used
- 8 1lb. Cotton Cones from Mary Maxim
- 1 Crochet hook 3.5 mm or whatever works for you.
I am writing the pattern for 4 inches or 10cm. You can make it for as long as you need it.
Abbreviations
Dc. Is double crochet
Sc. Is single crochet
Ch. is chain
For my drapes I started off with 493 chains. Whatever length you make it, don't worry if you have some chains left over at the end because you can get rid of them when you have the pattern established. Also I had originally planned to have them just past my window frame but with the weight it does pull them down more with the stretch.
Pattern for 4 Inches
Chain 37 plus 3 for first dc. turn
Row 1. 2 dc. in 3rd st. from hook, ch3 and skip 5 ch. and sc in next chain, ch3 skip 5 ch and 3 dc ch1, 3dc in next ch, c3 skip 5 ch and sc in next ch, ch3 and skip 5ch and 3 dc ch1, 3dc in next stitch, ch3 skip 5ch and sc in next ch, ch3 skip 5ch and 3dc in last ch, turn
Row 2. ch3 (always count for first dc) 2 dc in 3rd ch from hook. ch3 sc in same sc in previous row, ch3 3dc ch1, 3dc in ch3loop in row 1,ch3 sc in sc in row1, ch3 3dc ch1 3dc in ch 3 loop in row 1, ch3 sc in same sc in previous row, ch3 3dc in last dc of previous row. Turn
Row 3. ch3 2dc in 3rd chain from hook, ch 6 turn skip 1ch 5sc in each of the next 5ch just made, turn ch1 and 5sc in previous 5 sc turn, c1 5sc of previous row, sc in sc of row 2 turn, 5sc over same 5sc turn, 3dc ch1 3dc in next ch3 space of row 2, ch6 skip 1ch sc in next 5c turn, ch1, 5 sc in previous 5sc turn, ch 1, 5 sc in previous 5sc, sc crochet in sc of previous row turn, 5sc on same 5sc and 3dc ch1 3dc in ch3 loop of row 2, ch6 skip 1ch 5sc in ch5turn, ch1, 5sc in previous 5sc turn, ch1, 5sc over previous 5sc sc in sc on row 2 turn, 5sc over previous 5sc 3 dc in last dc. Turn
Row 4. Repeat Row 2
Row 2-4 is the pattern. Keep repeating rows till you have the desired width.
A Word of Advice
If you have to make several panels (I needed 4 right beside each other), it is very important that you get them even. Make a note of how many stitches you started with and count your patterns when you start the second panel in order to ensure your curtains hang evenly when they are done.
NOTE: I have made this pattern for 4 inches, but you can make it as long and as wide as you need it. You can also do the pattern horizontally. I personally did it vertically.
I practiced on 4 inches to see if I would like it the pattern first. I have not typically been impressed with crocheted curtains, so I wanted to make sure I liked the idea before investing too much time in it. I had a picture of a design I liked and worked out the stitches myself.
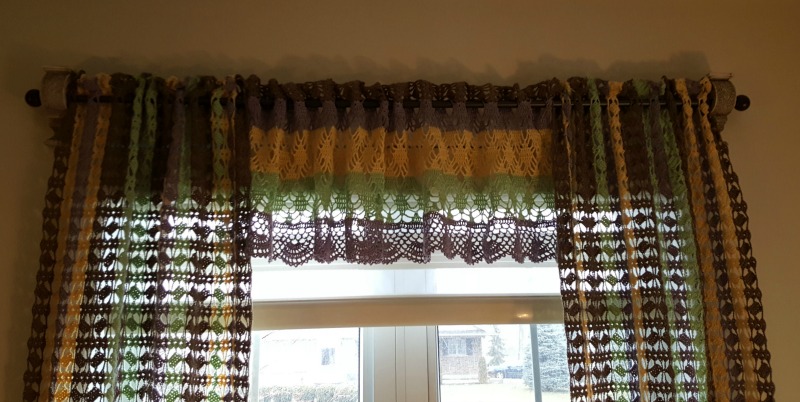 Handmade Crocheted Curtains Closeup
Pattern for Valance
I took the first 4 rows of the drapes horizontally (changing to a different pattern).
After 4th row (I am doing this over 25 stitches. You need to adjust it to the size you are making your curtains. I tried it on 25 stitches first to get an idea of the pattern and so I could adapt it with the one I was working on.)
Row 1. Ch1, 3dc, ch7, 1dc in each 3dc ch1 3dc of previous row, chain 7 and dc in each 3dc ch1 3dc in previous row.
(If you are doing a sample of 25 stitches, skip 5ch and do 1dc in each of the next 7 chains. Repeat till end of row finishing with 4dc)
I am giving you that first row because that is how I attached it to the 4 rows of the 1st pattern. I will continue now as it comes out on 25 stitches so you can get a hang of the pattern and adjust it to your size project.
Row 2. Ch1, 1dc in each of the next 3stitches ch4, 1dc in 4th stitch of ch. 7, ch4, skip 1dc, 1dc in each of the next 5dc, ch4, dc in 4th chain of ch7, ch4 repeat to end ending with skip 1dc, 1dc in next 2 dc and 1dc in first ch1 turn
Row 3. Ch 1, skip 1dc, 1dc in next dc, ch5, 1dc in ch before 1dc, 1dc in dc and 1 dc in ch after dc (3dc) ch5, skip 1dc, 1dc in next 3dc, ch5 repeat ending with skip 1dc, 1dc in next dc, dc in ch1, turn
Row 4. Ch6, 1dc before next group of 3dc, 1dc in next 3dc, 1dc in ch loop (5dc) ch5 skip 1st dc, dc in middle dc ch5, group of 5 dc over group of 3dc as with previous group, ending with 1dc in last ch, turn
Row 5. Ch9, 7dc over last group of 5, chain 7 repeat till ending with ch5 1 tr (thread around 2x) turn
Row. 6. Ch.6, 5dc over 7dc (in Center of 7dc) ch4, 1dc in 4th ch of ch7, ch4, 5dc over next 7dc repeat to end ending with ch4, 1dc in 5th ch of ch9 loop, turn
Row 7. Ch1, 1dc in next chain, ch5 3dc over 5dc group, ch5, 3dc over 1dc ch 5 repeat until end, ending with 2dc over last 2ch, turn.
Row 8. Ch3 1dc in next stitch ch 5 3dc over next 5dc ch 5, 5dc over next 3dc, ch5 repeat to end ending with 3dc over last dc turn
These rows make up second pattern. Repeat till you have the desired length for your valance.

Valance Edging
Finally, I added an edging. I will give you the pattern, but you must be aware that you may not have an exact full pattern at the end. Just finish it as far as you can. By that time you will be so accomplished, you will find a way. Mine turned out just about right, but I believe I added a few extra stitches at the end that I just worked into the pattern.
The pattern itself is over 20 stitches.
I did a 2 rows of dc all along the last row of the pattern we just did.
Row 1. Ch2 (1sc) ch3 , skip 2dc, sc in next sc, ch3 skip 2 dc, sc in next repeat to the end of row.
Row 2. Ch 5 (3ch is 1dc) sc in next ch3 loop, 8dc in next ch3 loop, sc in next ch3 loop, ch 3 sc in next loop repeat 2x, 8dc in next ch3 loop, sc in next ch3 loop, continue to the end ending if poss I leave with 8dc sc in next loop, ch3, sc in next loop, ch2 do in last stitch.
If you have a few extra stitches just work a few ch 3 sc in there you will never see that. Just keep an eye on your pattern. Turn.
Row 3. Ch 2 counts for sc, ch 3 sc in next ch3, ch1 dc in next dc 8x ch1, sc in next ch3 loop, ch3, sc in next loop, ch3 sc in next loop, ch3, ch1 1dc in next dc 8x, ch1 sc in next loop, repeat to the end of the row ending with ch3 sc in last stitch, turn
Row 4. Ch5 (ch3 for dc) sc in next loop ch1, skip 1ch, dc on each ch and dc in the group, (15 dc) ch1, dc in ch3 loop ch3 sc in next loop, ch 1 repeat to end of row ending with ch2, dc in last stitch. Turn
Row 5. Ch 2 (equals sc) ch 1, skip 1ch dc in next dc, ch2, skip 1dc, dc in next dc, 7x, ch1, sc in ch3 loop, ch 1 repeat to end, ending with sc in ch 3 of ch 5 loop. Turn
Row 6. Sc in first stitch ch3 sc in ch1, sc in ch2, ch3 sc in same ch 2 loop. Sc in next ch2 ch3 sc in same ch2 space. Repeat till end and you are finished.

Creative Crafts
by Jaclynn of All Trades
launching in March 2017!
Recent Articles
-
Getting Started Crafting Again
Aug 11, 21 02:02 PM
I would like to share my crafting story. I used to craft quite a bit, but quit a few years ago. Then, an acquaintance suggested I check out Pinterest. -
Coloring Book Art
May 17, 18 03:33 PM
 I was off from work in 2010 due to possible surgery. I was looking for an arts and crafts project. I bought coloring books for my granddaughter; who was
 -
Heart Shaped Boxes for Loved Ones
May 17, 18 01:33 PM
 I am crazy about making cards and other crafts and love to share these with other people. I made this heart shaped box with rich pink card stock, decorative


